Designing our Dream House in Singapore
After finally deciding on our ID, it was time to get down to designing our house! At this stage, we worked on the designs of our living room, kitchen, rooms, toilets, etc.
Initial Discussions with ID
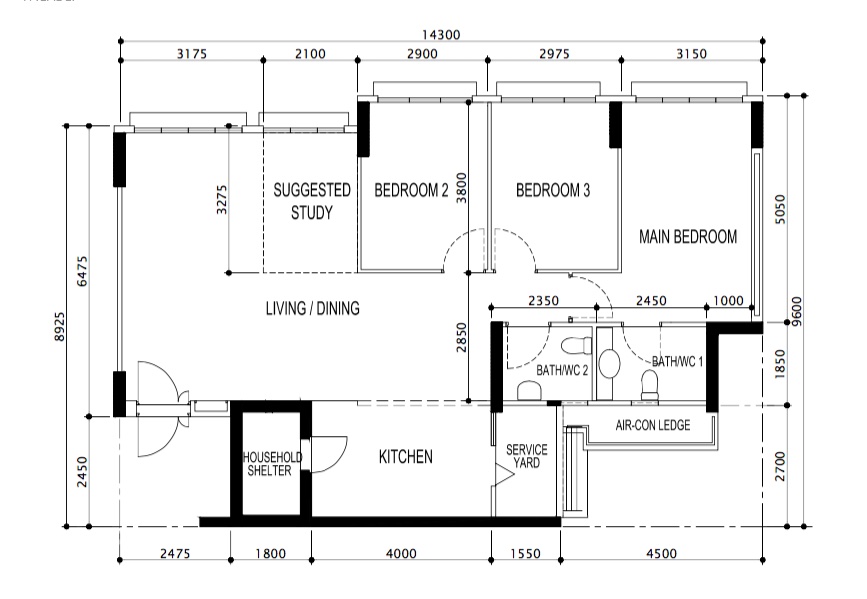 click to enlarge
We had several meetings with our ID to discuss the designs. Other than using our floor plan above, Raevian also came up with a mood board using pictures found from Pinterest and various websites. This helped to give our ID get a clearer idea of our preferred home design.
3D Drawings
After that, our ID came up with 3D drawings of our house. 3D drawings are basically computer-generated graphic designs of your house, used for space planning and carpentry designs. The 3D drawings were very helpful because they gave a clear visual representation of the house, which made it much easier for us to communicate our ideas to the ID. Simply discussing through 2D floor plans could lead to miscommunication. For example, based on the 3D drawings, we requested to change our TV console design, window and door designs for our service yard, kitchen island design, etc.
The drawings took almost 2 months to be completed because there were quite a few rounds of amendments, and our ID took quite long for each round.
Our final 3D drawings were very close to what we had in mind. However, we were supposed to have a three-panel glass door for our common toilet according to the drawing. Our ID told us afterwards that due to space constraints, we could only build a single-panel door. This was quite a disappointment. Therefore, make sure your ID takes into account your house dimensions when preparing the 3D drawings.
Living Room (3D)
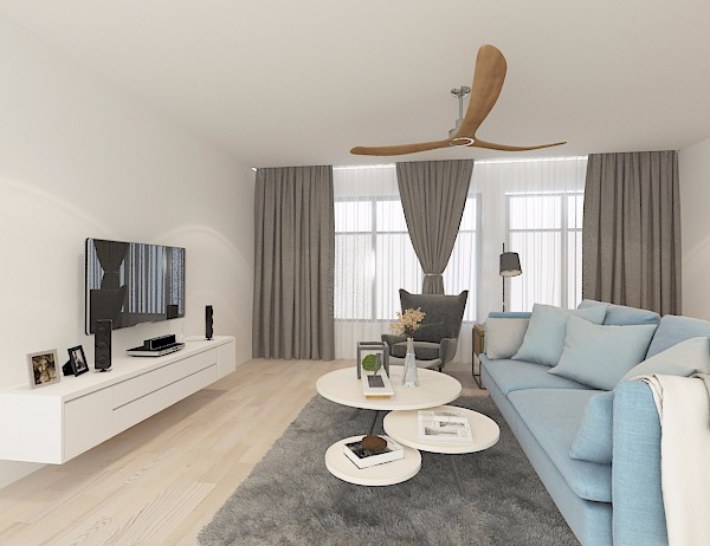
We wanted a sleek and elegant design for our living room. Therefore, instead of having a striking TV feature wall, we chose to mount our TV on a white false wall instead, with the wires hidden within the wall. This produced a seamless and minimalist look which we loved. Our ID helped us to design a simple TV console that was in line with the overall design. Later on, to add a touch of sophistication, we decided to install a pretty chandelier (instead of a ceiling fan) in the middle of our living room. This serves as the centerpiece of our living area.
Kitchen (3D)
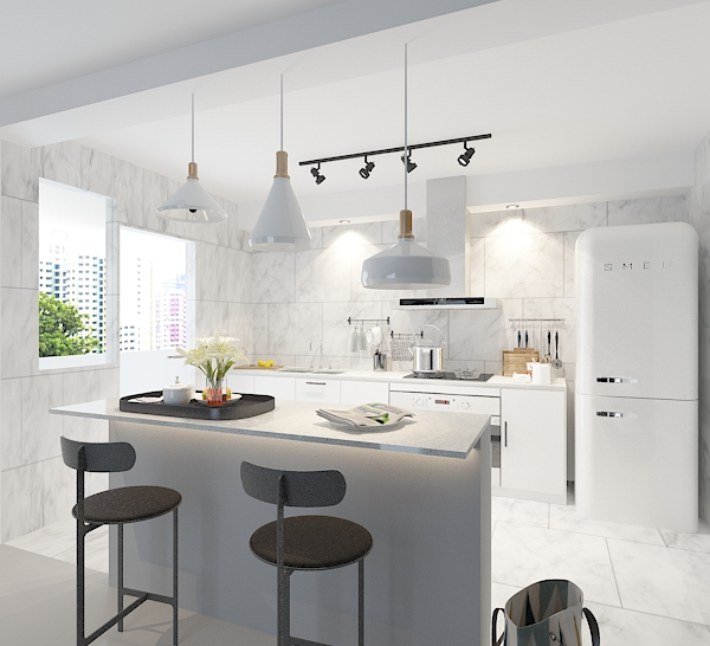
Right from the start, we wanted an open-concept kitchen because we felt it was a nice design, and would make our living room space bigger.
However, working out the details of the kitchen design gave us a big headache. Firstly, we had to think very hard about the overall look of the kitchen. Raevian and I went through lots of online pictures of model kitchens and had many discussions with each other. Finally, we decided to have a relatively simple kitchen layout: a kitchen island in the middle and no overhead cabinets. This was because we felt we didn’t need so much storage space, and our island has six big drawers to keep our stuff as well. We also have a wall-to-wall box-up above our kitchen cabinet to conceal the kitchen pipes on the top left hand corner.
As for the color, originally we wanted to go with white tiles for both our wall and floor. However, the tile that we wanted was out of stock. This turned out to be a blessing in disguise because we managed to find another Italian tile which combined the natural look of stone with the appeal of marble. We used this tile for our wall. As for our floor, we decided to extend our vinyl flooring from the living room into the kitchen, which turned out to be a good idea because it gives our living room and kitchen a seamless look and makes the overall space appears bigger.
Master Bedroom (3D)
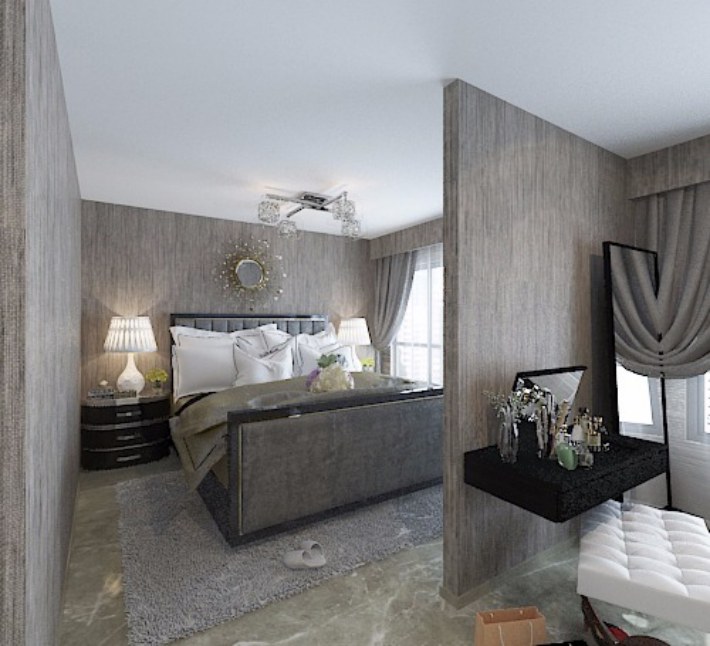
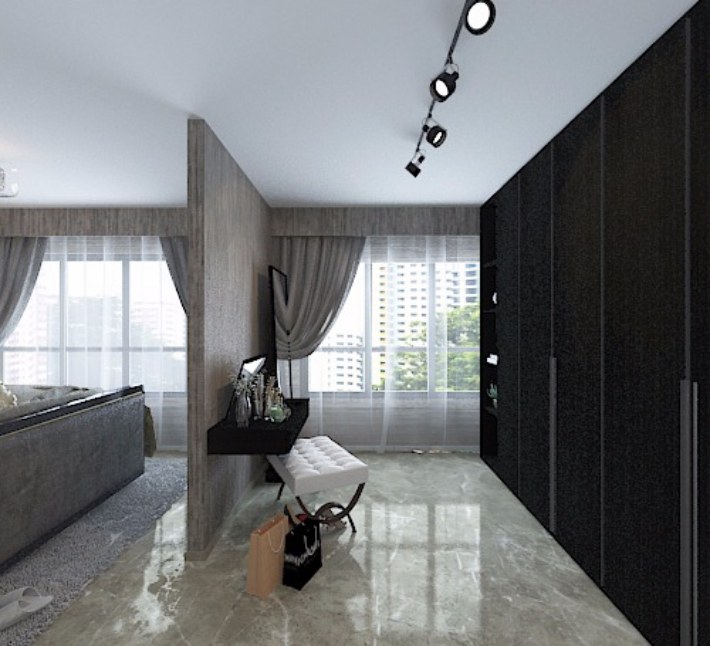
For our MBR, we decided to knock down the wall between our guest room and original MBR to create a bigger space. This was because we felt that the original space was too small for us. As everyone knows, home sizes in Singapore are constantly decreasing. However, the main reason for creating this bigger MBR was because Raevian wanted to have a walk-in wardrobe. And I had to agree happily agreed of course.
Common Toilet (3D)
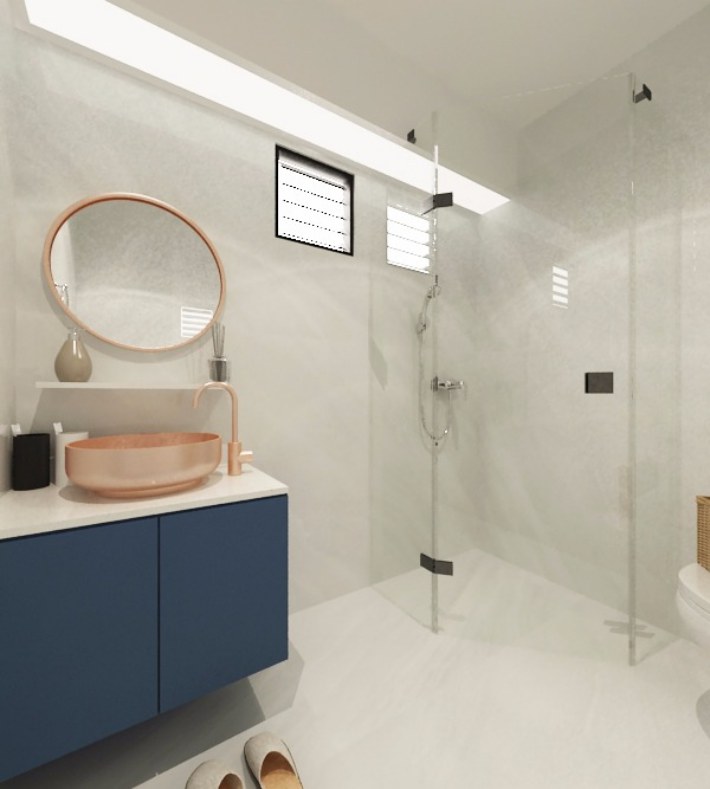
We wanted a modern, sleek and clean design for our common toilet. Therefore, we chose to use simple white tiles with minimum design patterns. We asked our ID to design a simple cabinet with white solid top, separated from the shower area by glass panels. As mentioned earlier, we had to change the design later on to a single glass panel due to space constraints.
Since the overall style of our washroom was rather simple, we decided to bring out its character by focusing on the smaller details. Therefore, for the vanity area, we hung up a vintage mirror purchased online. We also installed an elegant Kohler undermount basin that has beautiful contours around its borders. And for the shower area we simply installed a sleek handshower.
MBR Toilet (3D)
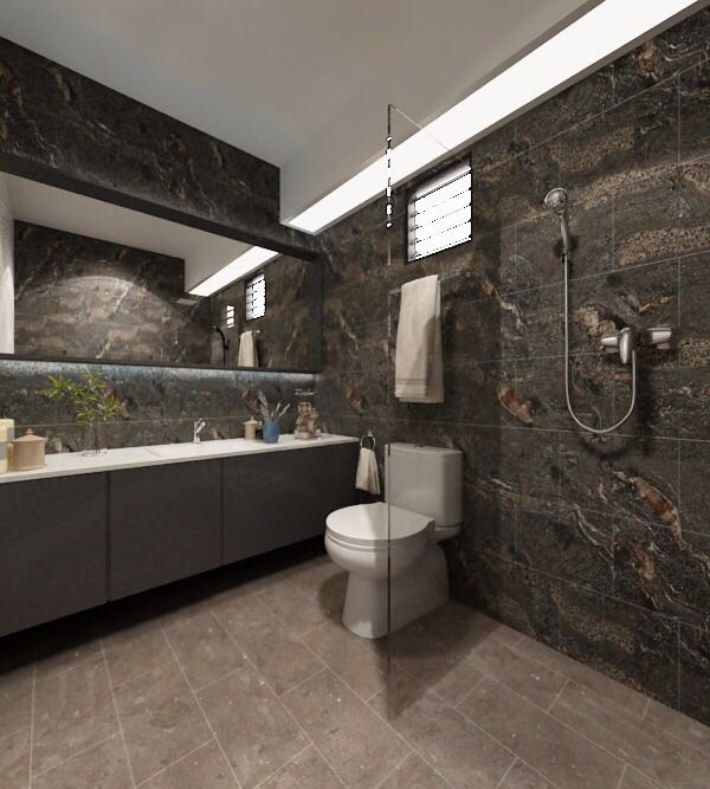
Our MBR toilet has a luxurious theme. Therefore, we decided to overlay our walls and floor with dark-coloured tiles. We used a dark laminate for our cabinet, and the vanity top has a dark solid surface. We installed a faucet with separate hot and cold taps.
For our shower area, we installed a luxurious Kohler rainshower, cordoned off by a glass shower panel with swing door. The centerpiece of our MBR toilet is a large vintage mirror which we purchased online.
Conclusion
It is best to get inspirations for your house design from pictures of beautiful homes. You should then create a mood board for your ID so that he/she will have an idea of your preferred style. Also, it is important to take note that 3D drawings are mainly used for space planning. The final look of your house will still very much depending on the tiles used, lightings, furniture, home accessories, etc.
This article is part of our completely free and super informative Singapore Home Renovation Guide. Why spend weeks researching when all your renovation information is simply a click away?
No comments yet